Mosquito Mount for Prusa Mini
Description
PDF*** V3.1 updated Mar. 18, 2021. Correctly aligned filament brass fitting threads, as per discussion in comments section. Originally was off by about 0.5mm, seems to be enough play in the design and PTFE tube for it not to have any effect however it is now aligned correctly. I did not get the chance to make a test print, let me know if there is any issues. Cheers.
This is a 'drop in' style mosquito mount following 4nthonylin's design (who referenced Woraphot originally).
There are 2 major changes from 4nthonylin's version:
1) Finding M2.5 screws to attach the Mosquito at the top is no longer required, you can use the supplied M2.5 bolts that ship with the mosquito. To do this, the bolts slide in from the rear and are tightened by inserting the 2.5mm allen key through the top. This gives more clearance for the original M8 brass fitting that this design utilizes. (Note: to initially insert the mosquito in, you will need to insert the M2.5 screws by 2-3mm, then slide the mosquito and screws into place in the mount.)
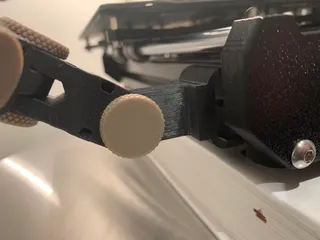
2) The front of the mount is opened up to reveal the Mosquito print :)
*Added version without front cutout
You will also need 4 M3 nuts, a ~17mm PTFE tube chamfered internally and externally on one side, and possibly a longer M3 screw to affix the south eastern corner of the fan, haven't checked but I think it will need to be 25-30mm.
This next part is copied verbatim from 4nthonylin, I couldn't have stated it better:
"The weight delta is 7grams, the original hotend being 44 and new one at 51 grams. The X is offset by 0.5mm, Y by -6.625mm, Z should be ~1 mm. Use "M206 X0.5 Y-6.625" after mesh bed leveling command in Custom Start G-Code to ensure prime line stays in bed OR move the bed ~6 mm towards you.
NOTE: If using the M206 command to set the offset in the start gcode, make sure you zero the offsets before you autohome and add it to the end gcode for good measures. I saw some issues where having the M206 offset set would mess with autohome. This is a known bug and you can see the issue on github: https://github.com/prusa3d/Prusa-Firmware-Buddy/issues/693
PID: You can also update the PID for the hotend to prevent overshoots, you can see this post for more information https://forum.prusaprinters.org/forum/general-discussion-announcements-and-releases/pid-tuning-2/#post-215137 I have a silicone sock on my mosquito and got the following "M301 P22.79 I1.79 D72.47" and placed it in my start GCode and only see 1-2 degrees Celsius overshoot now instead of 10C."
For my own setup, Instead of using M206, I changed the origin point within Prusa Slicer (Printer Settings > General > Bed Shape).
You will also need to modify the location of the starting primer extrusion, or it will extrude off the heat bed. In the Custom G code within slicer, add Y3.0-Y5.0:
"
; intro line
G1 X170 Y3.0 F1000 ; added Y3.0 to move primer line up.
G1 Z0.2 F720
G1 X110.0 E8.0 F900
G1 X40.0 E10.0 F700
G92 E0.0"
And lastly, you should re adjust your MINDA and do z-height etc..
PS This will drop into 4nthonylin's fan shroud too https://www.prusaprinters.org/prints/37368-prusa-mini-mosquito-fan-shroud
Print instructions
Printed in PETG 0.15 layer height, 20% infill, 3 perimeters. I will probably reprint in PC one day.
Place the fan side down (see textured side in photos). No support needed.
Tags
Model origin
The author remixed this model.


