Ender 3 - Y-Axis Stepper Damper V2
Description
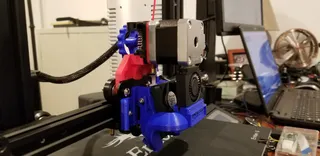
PDFWhen I originally ordered my Ender 3, I also purchased a few stepper motor dampeners. To my dismay, the stepper motors had press-fit pulleys, preventing me from being able to use most of them. My previous design worked very well, but it was a little more complex than I liked. This is a completely new design that's much cleaner and easier to install! This design reuses the existing stepper mount plate and screws. It also doesn't require any fiddling with the end stop.
NOTE: Does not work on the Ender-3 Pro
Also, check out these other mods that dramatically reduce the sound of your Ender 3
Enjoy the silence...
Print Settings
Supports:
No
Resolution:
0.2
Infill:
40%
Notes:
3-4 Wall Lines
4 Top/Bottom Layers
Post-Printing
Required:
- 1 x NEMA 17 Stepper motor damperwith large inner diameter like this one
- 2 x M4*16mm screws (optional)
Steps:
- Power down printer
- Remove wires from y-axis stepper motor and end stop
- Remove the stepper motor screws (4 x M3*6mm)
- Remove the stepper mount plate screws (2 x M4*16mm)
- Test fit siding the printed mount plate adapters into the end of the y-axis
(this will give you an opportunity to ensure the mounts fit flush) 6. Attach the stepper damper to original mount plate with 2 x M36mm screws 7. Attach stepper motor to stepper damper with remaining 2 x M36mm screws 8. Sandwich the original mount plate between the left and right printed mounts 9. Screw the printed mounts together with the 2 x M4*16mm screws
(do not tighten fully) 10. Slide the mounts into the end of the y-axis 11. Tighten the M4*16mm on the mount, until snug
(do not over tighten) 12. (Optional) Screw additional 2 x M4*16mm screws into the side of the stepper mount to improve stiffness 13. Loosen the belt tension assembly on the front of the printer
(this will need to move approximately 2mm towards the printer) 14. Slide the belt over the stepper motor pulley 15. Making sure the belt is under proper tension, tighten the front belt tension assembly 16. Reattach stepper motor and end stop wire connectors
It's a good idea to ensure the belt remains centered when moving the bed back and forth.
Category: 3D Printer Parts
Tags
Model origin
The author marked this model as their own original creation. Imported from Thingiverse.


