Accessories - Box(es), extensions and more for electronics CG Scale / Zubehör - Gehäuse, Verlängerung und mehr für Schwerpunktwaage
Description
PDFAccessory parts for noticeably big, variable CG Scale. All the way from a F3x glider to anything like a 25kg warbird or jet!
Additions and some remixes of the original CG scale parts from here … https://www.rc-network.de/threads/schwerpunkt-waage-mit-arduino.674777/page-27#post-7225691 – Post #526 from user “jochen-69”
Based on the ideas, electronics and software of “olkal” and “nightflyer88” https://github.com/olkal/CG_scale & https://github.com/nightflyer88/CG_scale/wiki/ESP8266:-Aufbau
Other parts I used:
Feet … https://www.thingiverse.com/thing:3082188
Profile plugs / end-caps 40x40 … http://www.thingiverse.com/thing:3258418
Profile plugs / end-caps 20x20 … https://www.thingiverse.com/thing:4730985
Cable passes / cable locks … https://www.thingiverse.com/thing:2868127
Knurled knob to fix the for / aft slider on the big profile … https://www.thingiverse.com/thing:4619771 (cut down before slicing)
Knurled knob to fix sideways-sliders – remixed from https://www.thingiverse.com/thing:177400
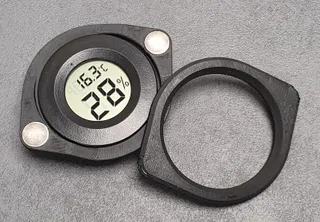
To mount the boxes on the profile, just glue the long T-Nut with some superglue to the back and slide it into the profile. But make sure the T-nut fits your profile before glueing! It is a quite tight fit and if your printer is not dimensional stable you might need to do some sanding.
Aluminium profiles used:
3x base, 40x40x500mm
2x sensor struts 20x20x500mm
4x model struts 20x20x200mm
The connector "Connector_20mm_profile.stl" can be used to extend the height of the 200mm struts so that models (some warbirds) with long gear struts can be put onto the scale.
The enclosed model supports are 40mm in diameter so that the pressure is better distributed on the wings - twice the size of the original.
-------------------------------------------------------------------
Zubehörteile für eine äußerst große und flexible Schwerpunktwaage. Für alles vom F3x Segler bis zum 25kg Warbird oder Jet verwendbar!
Zusätzliche Teile und einige Remixes von Originalteilen dieser Waage … https://www.rc-network.de/threads/schwerpunkt-waage-mit-arduino.674777/page-27#post-7225691 – Post #526 from user “jochen-69”
Based on the ideas, electronics and software of “olkal” and “nightflyer88” https://github.com/olkal/CG_scale & https://github.com/nightflyer88/CG_scale/wiki/ESP8266:-Aufbau
Weitere Druckteile die ich verwendet habe:
Füsse … https://www.thingiverse.com/thing:3082188
Endstück für 40x40 Profil … http://www.thingiverse.com/thing:3258418
Endstück für 20x20 Profil … https://www.thingiverse.com/thing:4730985
Kabelführung … https://www.thingiverse.com/thing:2868127
Geriffelter Knopf für die Längsverstellung auf dem 40x40 profil … https://www.thingiverse.com/thing:4619771 (Im Slicer in der Höhe reduziert; unter die Druckfläche geschoben und abgeschnitten)
Geriffelter Knopf zur Fixierung der 4 Steher – remixed von https://www.thingiverse.com/thing:177400
Um die Gehäuse auf das Profil zu montieren, einfach die lange T-Nut mit Superkleber an die Rückseite kleben und dann seitlich ins Profil schieben. Vor dem Kleben aber sicherstellen, dass die T-Nut in das Profil passt! Die Masse sind sehr eng bemessen; je nach Massstabilität des Druckers kann es notwendig sein ein wenig zu schleifen.
Verwendete Aluminium Profile:
3x Basis, 40x40x500mm
2x Querstreben 20x20x500mm
4x Modellstreben 20x20x200mm
Die Verbinder "Connector_20mm_profile.stl" dienen dazu, die 200mm Profile in der Höhe zu erweitern - für Modelle mit langen langen Fahrwerken, wie einige Warbirds.
Die beiliegenden Modellauflagen sind im Durchmesser 40mm groß um den Druck auf den Flächen besser zu verteilen - doppelt so groß als die Originalen.
Tags
Model origin
The author marked this model as their own original creation.


