Articulating Cam Mount with Heat Set Inserts

Description
PDFSummary
While there are a lot of good camera mounts out there already, I've set out to make another system that uses heat set inserts and basic pivot joints. The result is a light weight, sturdy, movable camera arm, with an inbuilt trough for cable management and channels for zip ties.
STLs are named with the following key:
- b = bolt
- hs = heatset
- s = side
- t = top
- b= bottom
example1: bot-hsob is bolt on top, heat set on bottom.
example 2: bos-hsob is bolt on side, heat set on bottom.
Orientation
When choosing the parts you need, remember the cable trough (after printing) will always be on the same face of the cable arm (ie, the bottom).
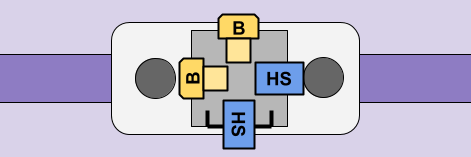
Screws/heat set inserts should always remain on the same two sides of the joints (ie bolts on left side/top, heat sets on the right side/bottom). With the 4 link combinations it's possible to switch from a horizontal joint to a vertical one, and vice versa. Heat sets should always be upstream on joints (closer to the camera), and bolts should be closer to the frame.
I have only made a mount for 2020 extrusions at this time due to my desire to keep weight off of the motion systems. Please feel free to remix this if you want to attach to your X gantry, etc.
Currently, I have three options for attaching the camera:
- Standard ¼-20 camera screw (printed part)
- Standard ¼-20 camera screw (female thread for an adapter, such as this)
- Logitech 9xx Series Webcam Mount (requires minor disassembly of Logitech cam)
If using the Logitech camera mount, follow this guide through step 5, then pull the metal supports out of the side of the stock mount, and insert them in to the printed part (be careful for the orientation of the metal prongs so that the cable management trough aligns with the back of the camera), then re-assemble.
Cable Management:
When securing the cable for your webcam, it is best to start on the camera side, and work your way back to the frame. At each joint- extend the cable to it's most strained position and then firmly secure it to the next joint in the chain with a zip tie.
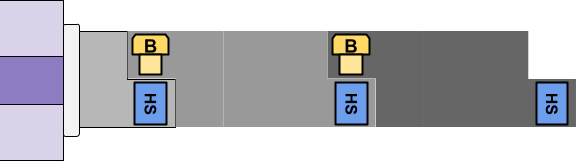
Example Setup:
Though I tested all of my parts and you can assemble in any configuration you like, if you want the exact configuration I found useful, see below:
2020 frame → 2020_mount_hsb → bot-hsob → bot-hsob → bot-hsos (change direction) → bos-hsos → bos-hsos → logitech9xx_bos → logitech c920
Bill of Materials
- M3 Thread Brass Knurled Nuts Threaded Heat Set
- M3 x 8mm Socket Head Cap Bolts
- 2x M5 x 10mm Socket Head Cap Bolts
- 2x M5 Roll-in Spring-Loaded T-Nuts (or any other M5 tnut of your preference)
- Small Zip Ties
Print Instructions
Orientation
I recommend to print all parts as oriented in the model.
Supports
Parts do not need supports, with the exception of :
- camera_screw_bos.stl
- camera_screw_bot.stl
- logitech9xx_bot.stl
I used paint on supports in Prusa slicer to minimize the supports needed.
Other Settings
All parts can be printed with 15% infill and 2 perimeters, with the exception of:
- camera_screw_bos.stl
- camera_screw_bot.stl
- camera_screw_female_bos.stl
- camera_screw_female_bot.stl
- logitech9xx_bot.stl
- logitech9xx_bos.stl
For these I recommend 50% infill, 5 perimeters, and 5 bottom layers.
Filament
While I've used ASA, PETG is also suitable. PLA would work for an open air printer, but I've avoided it due to it's low glass transition temperature (since my printers are all enclosed).
Tags
Model origin
The author marked this model as their own original creation.