CR6 5015 part fan shroud dual fang

Description
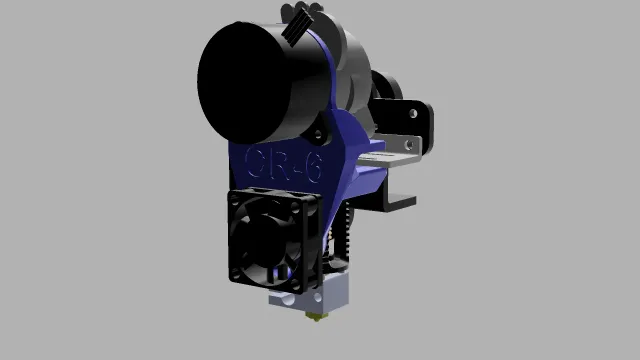
PDFCR6 universal dual fan 5015 part fan shroud
This part fan solution provides a dual fan shroud and uses a 5015 blower fan that will fit on most hot ends (checked with stock, Dragon, Mosquito and MicroSwiss hot ends). The part replaces the lackluster 4010 part cooling fan and provides proper cooling to the Creality CR6 and CR6 Max printers.
The main advantages of upgraded cooling are way better overhangs and bridging plus the ability to print faster (I print routinely at 150 mm/s).
Parts with and without Bowden adapter are available. The model with Bowden adapter only has a single position and cannot be slid to adjust.
Part of a series:
This fan shroud is part of a series of mods for the Creality CR6 SE and CR6 Max:
https://www.printables.com/model/139280-cr-6-lgx-lite-mosquito-mount-to-the-cr6-strain-gau
https://www.printables.com/model/126838-cr-6-direct-drive-dragon-hf-sf-and-orbiter-v15-mou
https://www.printables.com/model/129781-cr-6-direct-drive-mosquito-standard-and-magnum-and
https://www.printables.com/model/132112-cr-6-direct-drive-stock-or-microswiss-hotend-orbit
Needed parts:
5015 blower fan example: https://www.aliexpress.com/item/1005003878734109.html?algo_exp_id=7e80627d-e82a-4618-8c97-31eed1c7b3a7-2&pdp_ext_f=%7B%22sku_id%22%3A%2212000027374729481%22%7D&pdp_pi=-1%3B2.66%3B-1%3B-1%40salePrice%3BEUR%3Bsearch-mainSearch
Get a 4500 to 6000 rpm 5015 blower with (dual) ball bearings. Up to 5000 rpm blower fans are quite silent and deliver plenty of airflow.
M3 x 10 to 20 mm (the longer one fits an M3 locknut on the back if wanted).
2 x M3 x20 mm plus 2 M3 nuts
Printing:
Print in PETG, ABS, ASA or another high temperature filament. PLA will not be sufficient, the air outlets will met within the first print.
The model is oriented in the correct print direction. Maximum overhang is 45° and should print easily.
- 0.4 mm nozzle
- 0.45 mm line width
- 4 walls
- 4 top and bottom layers
- 20% gyroid infill
Mounting:
Remove the metal part fan shroud and original 4010 part cooling fan. These cannot be used in combination with any fan larger than a 4010.
Install the 5015 fan with 2 M3 x 20 mm bolts and nuts
The shroud slots over the carriage plate and fits with the pin just under the axis of the carriage wheel.
Fix with a single M3 bolt.
The optimal position I determined on my setup is between 50% and 75% of the mount slot towards the maximum you can slide the shroud over the carriage. The maximum exactly lines up the center of the outlets with the nozzle. Since we cannot print an outlet that has perfect 90° angles (at least not without supports) with the nozzle a slight offset is ideal.
The part with Bowden adapter cannot be slid over the mount as the Boden adapter limits its movement. make sure the Bowden tube slides trough without being kinked.
Usage:
3500 to 4000 rpm is sufficient for printing PLA. For most fans this will be 70 to 75% of its maximum speed.
For bridges and overhangs set the fan to 100% to profit from the increased cooling capacity (bridges fan speed in PrusaSlicer and experimental/bridge fan speed in Cura).
Also in PrusaSlicer enable auto cooling and in Cura set maximum fan speed to 100%, regular/maximum fan speed threshold to 15 sec and minimum layer time to 7 s. This will speed up very small prints.
Edit 2022 04 06:
- 2 mm increased clearance of the fang outlets to the hotend sock. Some people reported the fang to touch the sock on 1 side (it seems not all strain gauges are perfectly parallel to the printer bed).
- slight increase in clearance of the slot sliding over the carriage to facilitate easier mounting.
Tags
Model origin
The author marked this model as their own original creation.