Type 2 charging plug wall holder

Description
PDFI was inspired by the design of Lindh3D's “Type 2 cable holder”. But I didn't like the idea to print it with support. Also I thought it could be improved for less material use and better mounting. So I went on to design my own version while taking ideas of different already existing prints. Here is what I came up with:
This model consists of 3 printed parts. Then you need something with ø3 mm diameter as an axle. Anything like a wire or nail would do. Just cut it to a length of 18 mm. Fix the lever in the holder with this and make sure it is flush on both sides. Put a spring in and slide the cover on top of it. Then you have to mount it to the wall to get finished.
I recommend to print everything from PETG.
Changes 14th March 2022:
Added a second version of the holder with a closed back plane.
Changes 12th June 2022:
Added a third version of the holder with a 10 mm higher collar, so that longer or thicker cables are held better and do not slip off so easily.
Changes 09th March 2025
Added 2 versions, modified by User John. These designs are optimized for mounting on a stud beam and therefore the backplate has been narrowed.
Holder
Print the holder oriented like this:

Printer Setup
Layer thickness: 0,2mm
Supports: no
raft: I recommend yes
Perimeters: at least 3
Infill 15%
Weigth: about 87 gramms Filament
Printing time: about 9,5 h (Prusa MK3)
Sliding cover
Print the cover oriented like this:

Printer Setup
Layer thickness: 0,2mm
Supports: no
raft: no
Infill: increase perimeters instead
Perimeters: 3 (by this you get a solid piece withouth using infill)
weight: about 10 gramms Filament
Printing time: about 1 h 45 min (Prusa MK3)
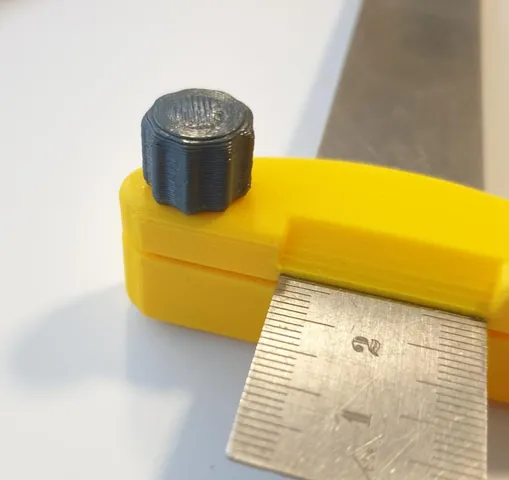
Lever
Print the lever with its upper side flat on the bed. Use the structured sheet, if possible, to get a nice surface on the button.

Printer Setup
Layer thickness: 0,2mm
Supports: no
Infill: 20%
Perimeters: 3
raft: no
weigth: about 5 gramms
printing time: about 30 min (Prusa MK3)
Axle
You need a piece of metal rod ø3 mm diameter. Length 18 mm. Anything like a wire or nail will do, a treaded rod is also possible.
Redrill the hole in the lever to make sure it moves easily on the axle.
Spring
I had a set of springs at hand from which I used these:
length 20 mm; outer diameter ø7,2 mm; wire thickness 0,6 mm
As long as it is 15 to 20 mm long it should work. You might have to modify the hole on top of the lever to fit your spring. Although I have not tested it, I think a spring from a standard ball pen might work.
Tags
Model origin
The author remixed this model.

Differences of the remix compared to the original
Complete new CAD-design for easy printing without support. Only the design idea was taken over.