Extruder Calibration (Part Fitting) Test
Description
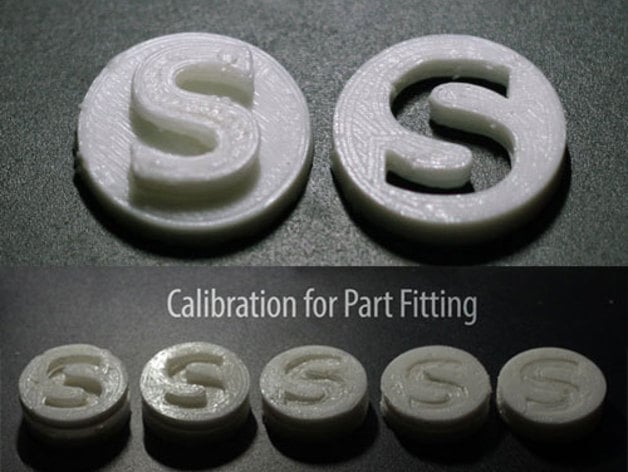
PDFA simple test for parts fitting. If the printer is properly set, the two parts should snugly fit each other, like two Lego blocks.
You should repeat prints while adjustingExtrusion Multiplier orFilament Flow Live Tuning (depending on your software and printer), until the two parts snugly fit. TheXY Size Compensation should not be used if extrusion is properly set!
The process should be done for each new roll of filament.
Unlike the original object, this one has alower base to increase printing speed and agroove on the top of both parts to mark the proper orientation.
NOTE
The layering effect affects the resulting inner and outer dimensions of printed objects. It can be more or less pronounced on your printer and settings, so your mileage may vary.
It also depends on your exact filament diameter and its consistency, so on a properly calibrated printer with a quality filament, the resulting extrusion multiplier will always be a few percents lower than 100%. Therefore, this is more of a "part fitting" rather than "exact extrusion" calibration (see https://mattshub.com/2017/04/19/extruder-calibration/ for the extruder steps calibration).
Calibration Process
- Print the objects. Wait until it cools down before removing from the print-bed.
- Try to plug one object into the other.Be careful, the orientationdoes matter!
a) If the objects can't fit,lower theExtrusion Multiplier orFlow and repeat.
b) If the objects fit too loosely,increase theExtrusion Multiplier orFlow and repeat.
c) If the two fit snugly (you can snap them together, but to disconnect them you need to use a tool), you're fine - the calibration is done! ###### Example:
- Start with EM value of1.0. Slice and print the two parts.
- If the parts can not fit, decrease to0.9.
- If they still can not fit, decrease to0.8.
- Now your parts are too loose. Now use0.85 (which is half the way between 0.8 and 0.9)
- If the fit is still too loose, use value0.875 (which is half the way between 0.85 and 0.9)
- If the fit is now too tight, use value0.863 (which is half the way between 0.85 and 0.875)
This value should be fine. It should be enough to round EM value to 3 decimals. ##### Update 2017-09-06
Added a groove on the top of both parts, in order to identify correct orientation.
Tags
Model origin
The author remixed this model. Imported from Thingiverse.

